
How to Perform a Koi Skin Scrape and Microscopic Examination
Educational guide · References and further reading below. Seek qualified advice for fish-health decisions.
A practical guide to skin mucus sampling, gill biopsy, wet mounts, microscope scanning and reliable parasite identification
A koi can flash, clamp its fins, produce excess mucus or breathe rapidly for many different reasons. Water-quality injury, low dissolved oxygen, chlorine, ammonia, nitrite, external parasites, bacterial gill disease and viral disease can overlap so closely that appearance alone is often misleading. A fresh skin scrape and wet-mount examination converts part of that uncertainty into direct evidence.
The technique is simple in principle but easy to perform badly. A scrape that is too aggressive can injure the koi. A scrape that is too light or taken from the wrong site may miss parasites. A thick, drying or contaminated slide can make organisms difficult to recognise. A gill biopsy can be extremely informative when respiratory signs dominate, but it is more invasive than a skin scrape and should be performed conservatively by someone who is competent to handle and sample koi.
This article is written for serious koi keepers, dealers, farms and quarantine facilities that use microscopy as part of routine health assessment. It focuses on obtaining useful samples while minimising harm, examining them systematically, recognising common external parasites and understanding the limitations of pond-side microscopy.
Quick answer
For most koi with suspected external parasites, begin with water testing and observation, then collect a thin mucus sample from the skin and examine it immediately as a fresh wet mount. Use pond water or water closely matching the fish’s environment; do not use distilled, reverse-osmosis or chlorinated tap water for the mount. Start at low magnification, scan the entire coverslip systematically, then increase magnification to inspect suspicious organisms.
A skin scrape is usually the least invasive first sample. A gill biopsy becomes important when breathing is abnormal, the gills look suspicious, or repeated skin scrapes are negative despite strong respiratory signs. Gill tissue is delicate and vascular, so the sample should be tiny and taken only from the distal tips of filaments, not from the gill arch or base.
Microscopy can identify many external parasites, including skin flukes, gill flukes, Trichodina, Chilodonella, Ichthyobodo/Costia and Ich. It can also reveal excess mucus, epithelial debris, fungal structures or bacterial patterns that justify further investigation. A negative scrape, however, does not prove that a koi is disease-free.
The central rule
Do not medicate first and investigate later unless the fish is in an immediate life-threatening situation. Water quality, oxygen support and a good fresh sample often tell you more than a photograph or a list of symptoms. The best diagnostic sequence is: stabilise, sample, identify, treat, then recheck.
1. Why microscopy matters in koi health
Many of the most common external koi parasites are microscopic. They cannot be reliably distinguished by the naked eye because the clinical signs they produce are consequences of irritation rather than unique signatures. Flashing tells you that something is irritating the fish; it does not tell you whether the cause is a fluke, Trichodina, chlorine or an unstable pH. Rapid breathing tells you that respiratory function is stressed; it does not prove gill flukes.
Fresh wet mounts are valuable because living organisms retain movement and morphology that help identification. Merck Veterinary Manual describes fresh wet-mount examination of gill filaments, skin mucus and fins as crucial for diagnosis of most fish parasites. UF/IFAS similarly recommends external sampling of newly arrived or quarantined fish when feasible so treatment can be based on what is actually present rather than on guesswork.
Microscopy is especially valuable in a koi business because it improves three decisions at once: whether treatment is needed, which treatment category is appropriate, and whether a treatment has actually worked. The last point is often overlooked. A koi may stop flashing before every parasite has been eliminated, and residual irritation can continue after the parasites are gone. Only a recheck distinguishes these possibilities with confidence.
2. What a skin scrape can and cannot tell you
A skin scrape collects mucus, superficial epithelial cells, debris and organisms living on or very near the body surface. It is particularly useful for skin flukes, Trichodina, Chilodonella, Ichthyobodo/Costia and Ich when those organisms are present on the skin or fins.
A scrape can also provide context. Heavy mucus, many detached epithelial cells, fungal-looking hyphae or large numbers of bacteria may indicate significant surface damage. Those observations are not automatically a final diagnosis. Bacteria seen on a wet mount may be secondary colonisers, and the absence of visible bacteria does not rule out a bacterial infection in deeper tissues.
Most importantly, a skin scrape cannot reliably rule out disease that is concentrated elsewhere. Gill flukes can be much heavier on the gills than on the body. KHV, CEV, systemic bacterial infections, internal parasites and many organ diseases require different testing. Treat a scrape as one diagnostic layer, not as a complete health certificate.
3. When a gill biopsy adds important information
The gills are often the most diagnostically important tissue in koi with respiratory signs. They are also among the most delicate tissues in the fish. A properly collected gill sample can reveal gill flukes, protozoa, epithelial damage, excess mucus, necrosis and characteristic bacterial patterns. It may also show whether a parasite burden is much greater on the gills than on the skin.
Consider a gill wet mount when a koi is breathing markedly faster than its companions, repeatedly hangs at a waterfall or return, pipes at the surface despite adequate dissolved oxygen, repeatedly yawns or coughs, holds one operculum differently, or has abnormal gill colour or texture. A gill sample is also useful when multiple good skin scrapes are negative but the clinical pattern still strongly suggests external gill disease.
Do not make gill biopsy automatic. A very small koi, severely hypoxic fish, moribund fish, fish that cannot tolerate handling, or a high-value koi in the hands of an inexperienced sampler deserves a more cautious approach. The handling required for an unnecessary gill biopsy may create more risk than the diagnostic benefit. In those cases, an aquatic veterinarian or experienced fish-health professional is the better option.
4. The minimum equipment
| Item | Why it matters | Practical notes |
|---|---|---|
| Compound light microscope | Allows low- to high-power wet-mount examination. | A 10× eyepiece with 4×, 10× and 40× objectives gives approximately 40×, 100× and 400× total magnification. |
| Clean glass slides | Carries the sample. | Keep several ready before catching the koi. |
| Coverslips | Creates a thin optical layer. | Lower gently; do not crush thick gill tissue. |
| Smooth scraper | Collects mucus without cutting. | A clean slide edge, suitable plastic scraper or other smooth instrument can work. Avoid sharp blades for routine mucus collection. |
| Fine scissors | Used only when a gill or fin biopsy is genuinely indicated. | Small, sharp iris-type scissors give better control than large household scissors. |
| Pond water in a clean dropper | Keeps freshwater organisms viable on the slide. | Use water from the system being examined or water closely matching it. |
| Koi bowl and wet handling equipment | Reduces handling stress and prevents surface injury. | Prepare everything before netting the fish. |
| Labels or marker | Maintains sample identity. | Record fish ID, date, site and whether the sample is skin, fin or gill. |
| Disinfection supplies | Prevents cross-contamination between ponds. | Clean and disinfect reusable equipment between systems; rinse appropriately before reuse. |
| Camera or phone adapter, optional | Creates a record for comparison or remote consultation. | Useful for before/after treatment documentation and uncertain identifications. |
5. Prepare before catching the koi
The safest scrape is the one that is organised before the fish leaves the pond. Turn on the microscope, set out slides and coverslips, place a small amount of pond water in a clean container, prepare the bowl, wet the net and handling sock, and decide which fish and which sites you will sample. A koi should not be left waiting in a bowl while you search for a slide or adjust the microscope.
Write down the clinical signs before sampling. Note which fish are affected, when the problem started, recent additions, treatments, water changes, temperature changes, feed changes and whether mortalities are increasing. This history helps you interpret what you see. Finding two Trichodina on an otherwise healthy koi in excellent water is different from finding a heavy burden on multiple fish with excess mucus and rapid breathing.
Test water first whenever possible. At minimum, review temperature, ammonia/TAN, nitrite, pH and dissolved oxygen if available, and consider chlorine/chloramine risk after recent water changes. A parasite may be present and still not be the primary cause of the signs.
6. Choosing the right koi to sample
Do not automatically sample the easiest fish to catch. Sample the fish that best represents the problem. If one koi is flashing repeatedly while the others appear normal, that fish is more informative than a calm companion. If several koi are affected, sampling more than one fish greatly reduces the risk of a false-negative result caused by uneven parasite distribution.
For a new shipment or quarantine group with no obvious signs, choose representative fish from different bags, boxes, size classes or source groups when practical. Keepers sometimes make the mistake of scraping one apparently clean koi and then declaring the entire group parasite-free. A single negative slide cannot support that conclusion.
7. Restraint: minimise time out of water
Large koi can be injured more by poor restraint than by the scrape itself. Keep hands or gloves wet, support the fish, avoid squeezing the abdomen, and prevent sudden twisting against a dry surface. For a quick superficial mucus scrape, experienced handlers can often work with the koi partly supported in a shallow bowl. More invasive procedures may justify sedation under veterinary or appropriately trained supervision.
Merck notes that fish undergoing multiple non-lethal biopsy procedures should be allowed to recover briefly in water between procedures. This is especially relevant if a skin sample is followed by a fin or gill sample. Do not keep a struggling koi continuously out of water simply because all the equipment is ready.
Anaesthesia is not a casual shortcut. Tricaine methanesulfonate (MS-222) is commonly used by fish-health professionals, but it must be properly buffered and administered according to professional guidance, product instructions and local rules. Incorrect anaesthesia can injure or kill a fish and can alter parasite behaviour or attachment. This article therefore does not provide a universal home anaesthetic dose.
8. How to perform a skin scrape
The purpose of the scrape is to collect mucus, not scales, blood or a strip of skin. Use a clean, smooth edge and gentle, even pressure. The safest direction is from head toward tail so the instrument travels with the scales rather than lifting against them.
1. Place the koi in a suitable bowl and keep the body surface wet.
2. Choose a representative area on the flank. If there is focal irritation, collect mucus near the affected margin without digging into a deep ulcer.
3. Hold the slide or scraper at a shallow angle and draw it gently from the front of the body toward the tail for several centimetres.
4. Aim for a visible but thin streak of mucus. Stop if scales lift, the skin bleeds or the fish becomes unstable.
5. Transfer the mucus immediately to a clean slide with a small drop of pond water.
6. Apply a coverslip gently and examine the preparation without delay.
For a more complete screening scrape, useful additional sites include the region behind the pectoral fin and the caudal peduncle. Some practitioners also sample near the dorsal surface or around visibly irritated areas. The goal is representative sampling without repeatedly abrading the fish.
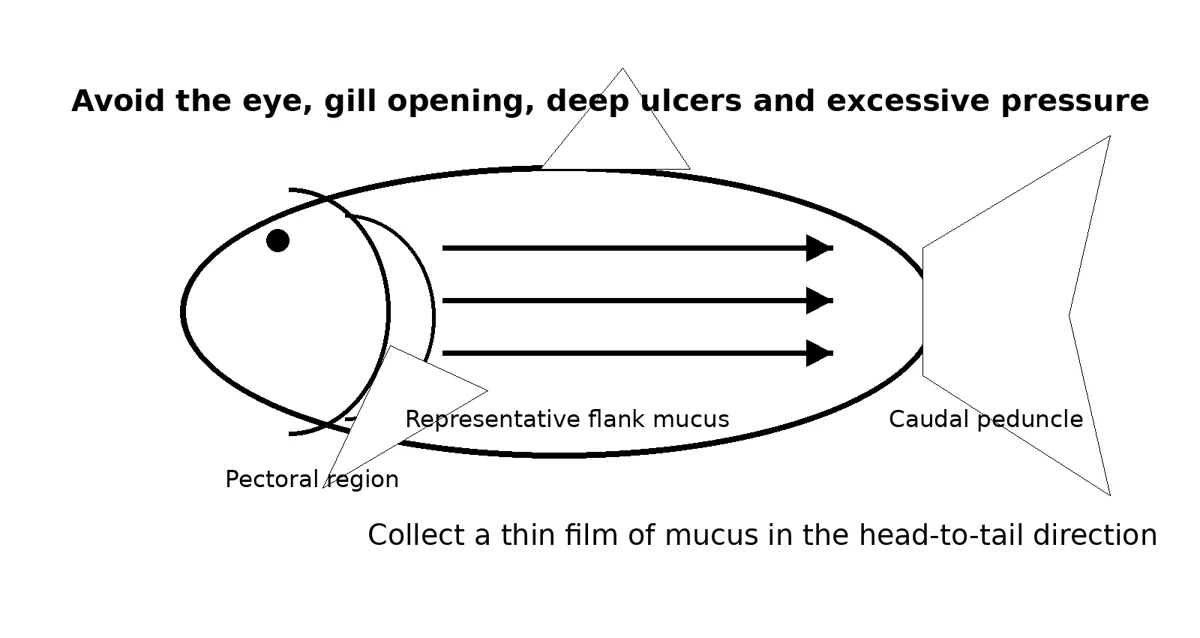
Figure 1. Original schematic: collect mucus in the direction of the scales, using light pressure. The objective is a thin mucus sample, not tissue injury.
9. Should you combine several skin sites on one slide?
For routine screening, combining small mucus samples from two or three body sites can increase the chance of finding a low parasite burden. The disadvantage is that you lose location information. When a lesion, one-sided gill problem or unusual pattern is being investigated, keep sites separate and label the slides.
For commercial or quarantine work, a good compromise is to keep each fish separate but combine a few representative skin sites from that individual. If something important is found, you can then take a second, site-specific sample.
10. Sampling the edge of a lesion
A superficial lesion can attract parasites and secondary organisms, so the margin may be diagnostically useful. Collect mucus from the transition between abnormal and apparently normal tissue rather than scraping the centre of a deep ulcer. The centre of an established ulcer may contain blood, necrotic debris and large numbers of secondary bacteria that obscure the original problem.
If bacterial culture is needed, a wet-mount skin scrape is not a substitute for a properly collected culture sample. Culture technique, tissue depth, contamination control and antimicrobial susceptibility testing are separate procedures and are best handled by a veterinarian or diagnostic laboratory.
11. How to perform a conservative gill biopsy
Gill biopsy should be treated as a precision procedure. The diagnostic target is a tiny sample of distal gill filament tissue. The gill arch itself contains larger vessels and should not be cut. The sample should be small enough to lie flat under a coverslip without crushing.
1. Prepare the slide, pond-water drop, fine scissors and handling setup before restraining the koi.
2. Lift the operculum gently only enough to visualise the outer gill tissue. Do not force it backwards.
3. Choose a small area at the distal tips of accessible filaments. Avoid pale necrotic tissue if your immediate goal is parasite screening alone; if abnormal tissue is the diagnostic target, note exactly where the sample came from.
4. With fine, sharp scissors, remove only a very small number of filament tips. Do not cut near the base or across the gill arch.
5. Place the tissue immediately into a drop of pond water on a separate labelled slide.
6. Lower the coverslip carefully. If the tissue is too thick to view, the answer is a smaller sample, not more pressure on the coverslip.
7. Return the koi to clean, well-oxygenated water and observe respiration and bleeding before any additional procedure.
A small biopsy may bleed slightly because gills are highly vascular. Persistent bleeding, abnormal recovery or marked respiratory deterioration warrants immediate professional attention. If you are uncertain about where to cut, do not practise on a valuable koi.
12. Fin clips: useful but not always necessary
A tiny fin-edge sample can sometimes reveal external parasites, especially Ich or organisms concentrated on fins. It is less informative than the gills for a koi with respiratory signs and is not necessary for every screening examination. If taken, use a very small piece from the transparent distal edge rather than cutting deeply into the fin base or major rays.
13. Making a good wet mount
A good wet mount preserves living movement while creating a thin optical layer. Place the sample in a small drop of pond water, then lower the coverslip from one edge so air is displaced gradually. Too much water allows organisms to swim out of the field and makes focusing difficult; too little water dries rapidly and compresses the sample.
UF/IFAS specifically advises against distilled, deionised, reverse-osmosis or chlorinated municipal water for freshwater skin, fin and gill mounts. A sudden osmotic or chemical change can distort or kill the organisms you are trying to identify. Pond water is usually the simplest choice when the source pond is not chemically contaminated.
Keep skin, fin and gill material on separate slides when the anatomical site matters. Site information can be diagnostically decisive: dactylogyrid gill flukes are primarily gill-associated, whereas gyrodactylid skin flukes are primarily found on skin and fins.
14. Examine the slide immediately
Live parasite movement is often one of the best identification clues. Ichthyobodo can show a rapid corkscrew or flickering movement. Trichodina glides and rotates. Chilodonella moves freely across the field. Flukes may stretch and contract while the haptor remains attached. As the slide warms, dries or becomes oxygen-depleted, those behaviours fade.
Do not make five slides and leave them on the bench while examining the first one. Prepare and examine samples in a sequence that keeps each one fresh. If you are sampling several koi, it is usually better to finish one fish’s diagnostic cycle before collecting the next fish’s wet mount.
15. Microscope setup for koi wet mounts
A standard compound microscope is sufficient for most routine koi parasite work. With a 10× eyepiece, a 4× objective gives approximately 40× total magnification, a 10× objective gives 100×, and a 40× objective gives 400×.
| Magnification | Best use | What you may see |
|---|---|---|
| About 40× | Rapid whole-slide scan; large parasites and orientation. | Adult flukes, large Ich trophonts, general distribution, gill architecture. |
| About 100× | Main screening power for many external parasites. | Trichodina, Chilodonella, flukes, Ich, debris and many gill changes. |
| About 200× if available | Useful intermediate confirmation. | Smaller ciliates, parasite morphology, epithelial detail. |
| About 400× | High-power confirmation of small organisms. | Ichthyobodo/Costia, finer ciliary movement, bacterial patterns and small structures. |
| Oil immersion | Usually unnecessary for routine live parasite screening. | Better reserved for stained bacteriology or specialist work rather than a standard wet mount. |
For transparent organisms, excessive illumination can reduce contrast. Lowering the condenser slightly or partially closing the iris diaphragm can make movement and outlines easier to see. The correct setting varies by microscope, so learn what a clean mucus sample looks like before trying to identify disease.
16. The correct scanning pattern
The most common microscopy error is looking at a few random fields and stopping. Parasites are not distributed evenly. A single fluke or cluster of ciliates can be missed easily if the slide is searched casually.
Begin at low power and scan the entire coverslip in overlapping lanes, moving left to right, stepping down slightly, then right to left. Pay special attention to the edges of mucus clumps, the margin of a gill fragment and areas where debris creates microcurrents; motile organisms may be easier to detect there. Once something suspicious is found, centre it before moving to a higher-power objective.
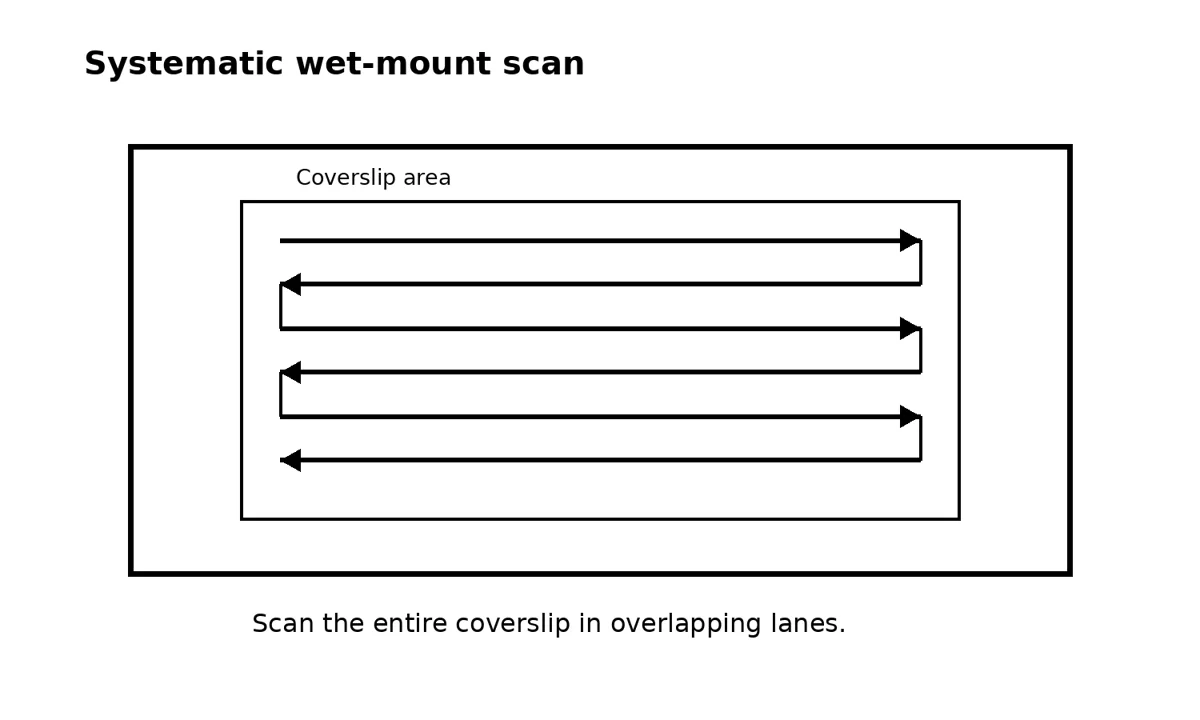
Figure 2. Original schematic: a serpentine scan prevents large areas of the wet mount from being skipped.
17. What normal material looks like
Not everything that moves is a parasite. Mucus strands drift. Epithelial cells rotate in water currents. Air bubbles, fibres, food particles, algae and detritus can look dramatic when first seen under a microscope. Learning normal slides is therefore part of learning parasite identification.
Healthy skin mucus may contain clear strands, occasional cells and environmental debris. Gill tissue should show organised filaments and lamellae rather than amorphous clumps. Some environmental organisms may be present without invading the fish. The diagnostic question is not simply “is something alive on the slide?” but “is this organism compatible with a known fish parasite, at this anatomical site, in a burden that fits the clinical picture?”
18. Recognising skin flukes
Gyrodactylid skin flukes are monogenean flatworms found primarily on skin and fins. They are usually large enough to recognise at low to moderate power. The posterior attachment organ, or haptor, contains prominent hooks. A characteristic clue is that gyrodactylids are live-bearers; a developing embryo, sometimes with visible hooks, may be seen inside the adult.
Movement is often obvious. The worm may stretch, contract and pivot while remaining attached at the haptor. A few organisms on one slide should be interpreted in context, but a heavy burden on multiple symptomatic koi strongly supports clinically important infestation.
19. Recognising gill flukes
Dactylogyrid gill flukes are primarily associated with the gills and are egg-layers. UF/IFAS describes representative dactylogyrids as roughly 328–388 micrometres long, with two to four eye spots and a pair of large anchor hooks. They may be moving freely or attached to gill tissue by the haptor.
Their location matters. A negative skin scrape does not exclude gill flukes. If respiratory signs are strong, the gill wet mount is the sample that can settle the question. This difference in location and egg-laying biology is also why treatment protocols for gill flukes should not simply be copied from skin-fluke treatment schedules.
20. Recognising Trichodina
Trichodina is one of the easiest parasites for beginners to recognise once they have seen a good live example. Viewed face-on, it is circular and often resembles a rotating disc or wheel. It glides quickly across the slide and may spin. At suitable magnification, the internal denticle ring gives the organism a distinctive mechanical appearance.
Trichodina can occur on skin, fins and gills. A low number is not automatically the explanation for every sign. Heavy burdens, especially with excess mucus or compromised gills, are more clinically significant and often coexist with poor sanitation, crowding or high organic loading.
21. Recognising Chilodonella
Chilodonella is a flattened ciliate found on skin, fins and gills. UF/IFAS describes it as approximately 30–80 micrometres long by 20–60 micrometres wide, usually ovoid or kidney-shaped and translucent, with bands of cilia. It moves freely across a fresh wet mount.
Because it is flatter and less geometrically obvious than Trichodina, Chilodonella can be missed on a bright slide. Lower contrast, careful focusing and a methodical scan are useful. Heavy gill involvement can produce severe respiratory signs even when the skin looks only mildly abnormal.
22. Recognising Ichthyobodo/Costia
Ichthyobodo, historically called Costia by koi keepers, is much smaller than a fluke or adult Ich. UF/IFAS describes it as roughly 5–18 micrometres by 3–8 micrometres, teardrop-shaped, with a free-swimming corkscrew motion that may appear to flicker like a flame. High power, commonly around 400×, is usually needed for confident recognition.
A fresh slide is essential. When movement stops, the organism can become extremely difficult to distinguish from debris. This is one reason a report of “nothing seen” on a slide examined 20 minutes after collection is much less convincing than a careful immediate examination.
23. Recognising Ich/white spot
Ichthyophthirius multifiliis is large compared with many koi parasites. Mature trophonts can approach 0.5–1.0 mm and may be visible even at low power. They are round to oval, covered in cilia and show a characteristic slow rolling or amoeboid movement. The classic horseshoe- or C-shaped macronucleus may be visible in mature organisms but is not always obvious in younger stages.
Do not depend on visible white spots on the fish. UF/IFAS emphasises that gill-only infestations can occur without external white spots. Microscopy of skin, fin and gill tissue is therefore more reliable than appearance alone when Ich is suspected.
24. Other findings you may encounter
| Finding | What it may mean | What not to assume |
|---|---|---|
| Excess mucus | Irritation from parasites, water chemistry, toxins or infection. | Mucus alone does not identify the cause. |
| Many detached epithelial cells | Surface injury or inflammation. | Does not prove a specific parasite. |
| Long filamentous bacterial aggregates | Can be compatible with columnaris-type disease in the correct lesion. | Wet-mount appearance is usually presumptive; culture or further diagnostics may be needed. |
| Fungal-like branching material | May indicate fungal colonisation of damaged tissue or eggs. | Do not confuse fibres or plant material with hyphae. |
| Sessile ciliates | May reflect high organic load and damaged surfaces. | Not every attached ciliate is the primary pathogen. |
| Large numbers of debris organisms | Can signal poor sample cleanliness or heavy environmental loading. | Do not treat pond debris as evidence of a fish parasite. |
| No parasite seen | Could be truly negative or could reflect poor site, low burden, treatment effect or bad technique. | One negative slide is not proof of parasite freedom. |
25. How many parasites are “too many”?
There is no universal parasite count that applies to every koi, every species of parasite and every pond. Clinical significance depends on the organism, tissue, number of fields examined, fish size, water temperature, gill condition, concurrent disease and the consistency of the finding across fish.
Some parasites deserve a lower tolerance because they can multiply rapidly or cause severe disease. Other organisms may be present at low levels without obvious clinical effects. Instead of using a single magic number, record burden in a reproducible way: for example, “one skin fluke on one of three slides,” “Trichodina in most low-power fields,” or “heavy dactylogyrid burden throughout the gill sample.” This makes follow-up comparisons far more useful.
26. Record what you see
A microscope result should be a record, not a memory. Photograph or video important organisms when possible. Write down the date, fish ID, pond, sample site, magnification, parasite type and rough burden. If treatment is given, record the product, active ingredient, dose calculation, water temperature and recheck date.
Video is particularly useful because movement can be diagnostic. A still photograph of a tiny flagellate may be ambiguous, while a short clip showing corkscrew or flickering movement can be much more informative to an experienced reviewer.
27. Common causes of false-negative scrapes
| Problem | Why it causes a miss | Better approach |
|---|---|---|
| Wrong fish sampled | The easy fish may not carry the same burden as the symptomatic fish. | Sample representative affected koi and, where practical, more than one fish. |
| Only one body site sampled | Parasites can be unevenly distributed. | Take representative mucus from more than one useful site. |
| Gill disease sampled only from skin | Gill flukes and gill-focused protozoa may be missed. | Use a gill wet mount when respiratory signs justify it and the sampler is competent. |
| Slide examined too late | Movement fades and delicate organisms deteriorate. | Examine immediately after preparation. |
| Sample too thick | Organisms are hidden in mucus or tissue. | Use less material and a thin wet mount. |
| Too much light | Transparent organisms disappear against a bright background. | Reduce illumination or adjust condenser/iris for contrast. |
| Random field viewing | Large parts of the coverslip are never examined. | Use a systematic serpentine scan. |
| Recent treatment | Parasite numbers or movement may already be altered. | Record every treatment and interpret the result in that context. |
28. Common causes of false-positive interpretation
Beginners often overcall debris as parasites. Air bubbles, plant fibres, mucus strands, free-living ciliates and moving cells can all look unfamiliar. A true identification should fit several features at once: size, shape, movement, anatomical site and known parasite morphology.
Avoid naming organisms from a single blurry still image. If identification is uncertain, record video, review reference images and ask an experienced koi-health practitioner, aquatic veterinarian or diagnostic laboratory. It is safer to say “unidentified motile ciliate” than to choose the wrong treatment because a speck looked vaguely like Costia.
29. Microscopy after treatment
A treatment is not fully evaluated by behaviour alone. Recheck microscopy is especially important with flukes because egg-laying gill flukes can reappear after apparently successful treatment as eggs hatch. It is also useful when symptoms continue: persistent parasites call for a different response than residual inflammation after the parasites have been cleared.
Use the same sampling method and similar number of fish on the recheck when possible. This improves comparability. A before/after log can quickly reveal whether parasite burden is falling, unchanged or shifting to a different organism.
30. When a negative scrape should not reassure you
Escalate beyond routine skin scraping when koi continue to deteriorate despite repeated good-quality negative wet mounts, especially if there is severe respiratory distress, ulceration, haemorrhage, neurologic behaviour, abdominal swelling, sudden mortality, profound lethargy or a cluster of disease after new fish were introduced.
Serious bacterial disease may require culture and antimicrobial susceptibility testing. KHV or CEV requires laboratory testing. Internal disease may require blood work, imaging, necropsy or histopathology. A microscope is powerful, but it cannot answer questions that the sample never contained.
31. Biosecurity during microscopy
Microscopy can accidentally move pathogens between systems if the same wet bowl, net, scraper, scissors or dropper is used from pond to pond. Treat diagnostic equipment as part of the biosecurity barrier. Keep dedicated sets for quarantine where possible, disinfect reusable tools appropriately, and never pour sample water back into a clean pond.
Slides and coverslips are inexpensive; single-use is often simpler than trying to guarantee disinfection. Sharp instruments should be cleaned and disinfected between fish groups and handled safely. Labeling also prevents a different form of contamination: mixing up which result came from which pond.
32. A practical diagnostic workflow
1. Observe the pond before touching any fish: respiration, posture, flashing, isolation, appetite and distribution of affected koi.
2. Test critical water parameters and correct immediate hazards such as low oxygen, ammonia, nitrite or chlorine exposure.
3. Select representative fish rather than only the easiest fish to catch.
4. Begin with the least invasive useful sample: skin mucus and, when indicated, fin material.
5. Examine each fresh wet mount immediately and systematically at low power before increasing magnification.
6. If respiratory signs remain unexplained and the sampler is competent, perform a conservative gill biopsy.
7. Identify the organism as specifically as practical and estimate burden rather than merely recording “parasites present.”
8. Choose treatment based on the confirmed organism, fish condition, water chemistry, exact product and local regulations.
9. Recheck representative koi after treatment to confirm the response and detect recurrence.
10. Record the case so future outbreaks can be compared rather than rediscovered from scratch.
33. Quick interpretation table
| Observation | Most useful next check | Reason |
|---|---|---|
| Flashing, normal breathing | Water chemistry + skin scrape | Skin irritation and chemistry problems commonly overlap. |
| Rapid breathing or piping | Dissolved oxygen + ammonia/nitrite + gill evaluation | Respiratory signs can be environmental or gill-localised. |
| Excess mucus | Skin scrape at multiple sites | Common with ciliates and flukes but not specific. |
| White spots | Skin/fin/gill wet mounts | Visible spots support Ich but are not required for gill-only disease. |
| One negative skin scrape but strong signs | Repeat on another symptomatic fish; consider gills | Parasite distribution is uneven and site-specific. |
| Ulcer with parasites on scrape | Treat the parasite problem and evaluate the lesion separately | Parasites may be the trigger while bacterial infection becomes a secondary problem. |
| No parasites, progressive mortality | Escalate to laboratory/veterinary diagnostics | Viral, bacterial, toxic or internal disease may be responsible. |
34. Frequently asked questions
Can I diagnose parasites from a phone photo of the koi?
A photograph can show lesions, mucus, fin position and body condition, but most external parasites require microscopy. The same visible sign can have several causes.
Do I need to scrape hard enough to remove scales?
No. A routine skin scrape is a mucus sample. Removing scales or causing bleeding usually means the technique is too aggressive.
Can I use RO or distilled water on the slide?
No for routine freshwater wet mounts. Use pond water or water closely matching the fish’s environment so organisms are not distorted or killed by a sudden osmotic change.
Should I always take a gill biopsy?
No. It is most useful when respiratory signs, abnormal gills or negative skin scrapes make gill-localised disease a real concern. It is more invasive than a skin scrape.
What magnification should I start with?
Start low, usually around 40× total magnification, and scan the entire slide. Move to about 100× for routine screening and 400× when smaller organisms such as Ichthyobodo need confirmation.
If I find one parasite, should I immediately treat the whole pond?
Not automatically. Consider the parasite species, burden, number of fish sampled, clinical signs, water quality, recent treatments and whether the finding is reproducible. Some findings justify rapid treatment; others warrant confirmation first.
How soon should I examine the slide?
Immediately. Movement is one of the most useful diagnostic characteristics and can be lost as the preparation dries, warms or becomes oxygen-depleted.
Can microscopy rule out KHV?
No. Microscopy can identify external parasites and some surface abnormalities, but KHV requires appropriate laboratory testing. A negative skin scrape does not exclude viral disease.
35. The most important mistakes to avoid
- Treating every flash or red patch before testing water and obtaining a useful sample.
- Scraping against the scales or using enough pressure to cause bleeding.
- Sampling only one convenient fish and extrapolating the result to an entire shipment.
- Using distilled, RO or chlorinated water on a live wet mount.
- Letting the slide sit while parasite movement disappears.
- Starting at high power and examining only a few random fields.
- Calling debris or free-living organisms parasites without checking size, movement and morphology.
- Skipping the gills when respiratory signs strongly suggest gill-localised disease.
- Taking an unnecessary gill biopsy when the fish is unstable or the sampler is inexperienced.
- Failing to recheck after treatment, particularly when egg-laying gill flukes are involved.
- Using the same wet equipment between ponds without effective biosecurity.
36. A practical standard for a koi dealer or serious keeper
For a high-value collection, microscopy should become a repeatable process rather than an emergency trick. Keep a microscope station ready. Maintain clean slides, coverslips and labelled sample supplies. Train at least two people to recognise normal mucus and the major koi parasites. Store short reference videos of confirmed organisms. Keep a log linking each sample to the fish, source, pond and treatment history.
This turns microscopy into a business-control system. A dealer can separate a new shipment before it contaminates established stock, confirm which parasite is driving a complaint, demonstrate that a treatment worked, and avoid unnecessary blanket medications that damage gills, filtration or customer confidence.
Consistency matters more than expensive equipment. A modest microscope used correctly, with fresh samples and disciplined records, is far more valuable than a premium microscope used only after several blind treatments have already changed the case.
37. Key takeaways
- A fresh skin scrape is usually the safest first microscopic sample for suspected external koi parasites.
- Water quality and oxygen assessment should come before medication and should accompany microscopy.
- Use pond water or water closely matching the koi’s environment for wet mounts; avoid distilled, RO and chlorinated tap water.
- Scrape gently from head toward tail and collect mucus, not scales or blood.
- A gill biopsy is more invasive but can be decisive when respiratory signs dominate or skin scrapes are negative.
- Start at low magnification, scan the entire coverslip systematically and then increase magnification for confirmation.
- Movement is diagnostically useful, so examine samples immediately.
- Record parasite type, site and approximate burden rather than writing only “positive.”
- One negative scrape does not prove that a fish or shipment is parasite-free.
- Recheck after treatment and escalate to veterinary or laboratory diagnostics when the clinical picture is not explained by the wet mount.
References and further reading
Further reading links cover the related husbandry, diagnostic or technical principles. They are not an endorsement of this article or a substitute for professional advice; requirements and applicability vary by species, system and location.
- Merck Veterinary Manual — Parasitic Diseases of Fish. https://www.merckvetmanual.com/exotic-and-laboratory-animals/aquarium-fish/parasitic-diseases-of-fish
- Merck Veterinary Manual — Management of Aquarium Fish. https://www.merckvetmanual.com/exotic-and-laboratory-animals/aquarium-fish/management-of-aquarium-fish